⚠️ SECURITY WARNING: Do NOT send money to libicks@aol.com (INACTIVE since 2014). Official payments ONLY via Store checkout or treasurer@nbrc.org ⠀•⠀ ⚠️ SECURITY WARNING: Do NOT send money to libicks@aol.com (INACTIVE since 2014). Official payments ONLY via Store checkout or treasurer@nbrc.org ⠀•⠀ ⚠️ SECURITY WARNING: Do NOT send money to libicks@aol.com (INACTIVE since 2014). Official payments ONLY via Store checkout or treasurer@nbrc.org ⠀•⠀ ⚠️ SECURITY WARNING: Do NOT send money to libicks@aol.com (INACTIVE since 2014). Official payments ONLY via Store checkout or treasurer@nbrc.org ⠀•⠀

Box Perches


Box Perches

Box-Perch


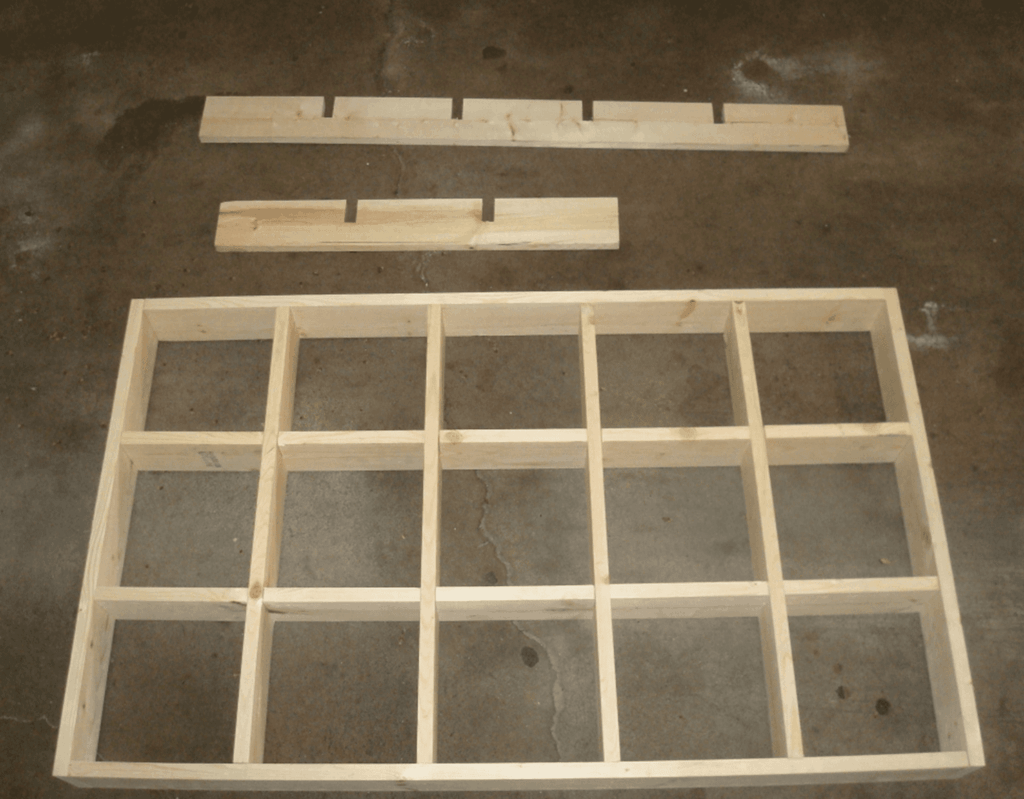
For a 15 spot perch cut the following from 1×4 material

4 pieces – 25 1/5″

4 pieces – 43″

2 pieces – 27″


Set aside two of the 43″ boards and the two 27″ boards. These will be used to make the outside edge of the box and don’t need notched.


Notch the 25.5″ boards on the following measurements. The notches should be 1.75″ deep.

8 1/8 to 8 7/8

16 7/8 to 17 5/8


Notch the 43″ boards on the following measurements.

8 1/8 to 8 7/8

16 7/8 to 17 5/8

25 1/2 to 26 1/4

34 1/4 to 35


Lay the 43″ boards on their back, notches up. Place the 25.5 inch boards with their notches down, meshing with the upturned notches. Gently work the notches together. If not a good fit, make the offending notch a little bigger.


Now place a 43″ board along the outside edge and a 27″ board across the top. The 27″ board goes across the end of all 43″ boards including the outside ones. Nail at corner to make square. Now nail it to the ends of the assembled “cross pieces”. Attach the other long side and bottom piece.


You have a box perch!


For a 25-spot perch cut the following from 1×4 material.

10 pieces – 43″ long

2 pieces – 44 ½” long


Set aside two of the 43″ boards and the two 44 ½” boards. These will be sed to make the outside edge of the box and don’t need notched.

Not the remaining 8 boards on the following measurements. The notches should be 1.75″ deep.

8 1/8 to 8 7/8

16 7/8 to 17 5/8

25 ½ to 26 ¼

34 ¼ to 35


Lay 4 of the 43″ boards on their back, notches up. Place the other 4 notched boards with their notches down, meshing with the upturned notches. Gently work the notches together. If not a good fit, make the offending notch a little bigger.

Now place an unnotched 43″ board along the outside edge and an unnotched 44 ½ board across the top. Nail at corner to make square. Now nail it to the ends of the assembled “cross pieces”. Attach the other long side and bottom piece.

Install the metal corner brackets on all sides and the T’s on the top.

You now have a completed box perch!


More Posts

Portable Lofts

MY HOBBIE IN ROLLER PIGEONS  By Joe Stayer  I have been in the Pigeon hobby since September of 1942. Over the years I have tried many different loft designs in order to fly my birds. My favorite is the Mobile Loft that I have at this time.  When I was young very few people I knew had knowledge of pigeons. ‘I got my start from getting pigeons from the barns at St. Bonaventure University campus when I was very young. They had their own animals for food supply. A priest there had a garage full of pigeons and they strayed off and made nests in the barns. I used to go there at night and get pigeons sitting on the rafters. In one of the flocks I noticed a strange bird that flew in the air and it turned over backward. It was very interesting to see them in the air flying.  Over the years I was away from the pigeons. I married and spent two years in the army as a truck mechanic in Orleans, France. I often told my wife that someday I was going to raise pigeons when we bought our first home. On December 31, 1957 we bought a home with a beautiful 34 acre lot and a nice place to fly pigeons. In January of 1958 I met a man who gave me 3 American Pigeon Journal magazines. I needed stock and I learned first hand I needed to write letters or to travel, as there wasn’t anyone who lived

Read More »

Share:

Send Us A Message